

Poor thread tension leads to puckering, loops, missed stitches and even plain messy stitching. If you are seeing any of these symptoms, then it might be time to check your thread tension.
Correct thread tension should have equal tension on both upper and lower(bobbin) thread. The easiest way to check is if you stitch a normal run of about 6” in length (Pro Tip, Stitch on white or a light-colored fabric and use two different colour threads. For example, using Red on top and Blue at the bottom.) If both sides of the run look the same tension wise, then you are all set. If not, keep reading.
Before we jump in and start adjusting screws and knobs, it is best to do a little more investigation first. The last thing you want is to have spent hours adjusting just to find out that a faulty or worn-out needle is the culprit. So, here is a short list of things to check first:
- Is the machine threaded correctly? Diagrams on the machine helps you guide the thread through all the hooks and holes needed to feed it correctly, one missing step here can be disastrous, so be sure to double check.
- Check the thread itself, as with all things in life, thread has a shelf life. Though it does not have an expiry date, thread can become brittle or fray as it goes through all the hooks and holes when it gets old. Keep your thread away from sunlight and store them in a cool cupboard to extend its life.
- Change your needle, often a change in needles can make a huge difference. Needles wear out too, check for a burr on the tip and make sure you have installed it the right way.
- If you are using metal bobbins and might have dropped it in the past, this too can lead to some issues on its own. Damage can be invisible to the eye so it is always a good idea to keep a spare one to try and see if it will solve your problem.
- Finally, and this is 99.99% of the time going to be your solution. Make sure your machine is clean! Lint collects wherever there is friction with the thread. Cleaning your machine as per your manual is extremely important as this also avoids any other possible damage. Double check the path the upper thread takes on it is way to the needle and make sure all the hooks and holes are free from lint. Making two more knots in your thread and pulling them through your machine slowly using your hand will remove some of the lint in the hard-to-reach places.
If you checked all the above and still convinced your machine needs re-tensioning, we can start by stitching a simple run, this can be a square or just a straight line. Just make sure it’s large enough so you can easily see how the thread behaves on the straight lengths. Use the pro tip above to help make this part a bit easier for yourself.
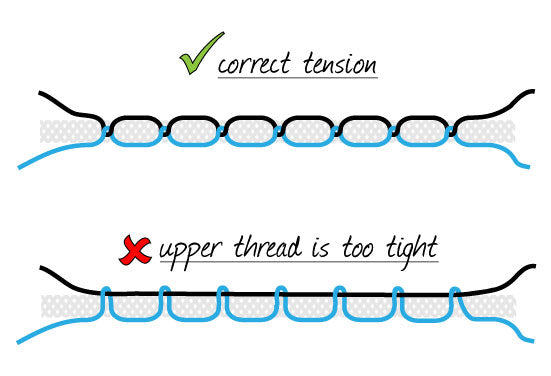
For our example we’re going to use black for the upper thread and blue for bobbin thread.
Now after stitching, if you find that you have blue loops on the black thread, the upper tension is too tight. Vice versa for the back end, if you have black loops on the blue thread then your bobbin tension is too tight.
To remedy this, you’ll start with the side you find the loops. Each machine is different in this regard to be sure to check your manual or contact your local dealer to find out where you can adjust your tension. We’ll start by adjusting in very small increments, if it’s a screw then you don’t want to turn this more than 10 degrees at a time. If you have a knob with predefined tensions, go with one unit at a time. Make only one change and stitch a sample, adjust again if needed and stitch another sample. Carry on like this until you are satisfied with the feel of the thread on the fabric.
Adjusting the bobbin thread is extremely easy, we will cover two bobbin configurations. Front loading and Top Loading. For front loading machines you will want to remove the bobbin with its casing then ensure it is threaded correctly through the little pig’s tail. Then hold the assembly over a soft surface (This will avoid damage to the bobbin if it drops too quickly) then pinch the thread with your fingers and let go of the assembly. If the assembly drops a couple of inches and stops still hanging by the thread the tension should be ok. If it drops onto the soft surface, you will need to adjust the small screw tighter with 10degrees at a time, repeat the test several times until you achieve the short distance drop as mentioned.
For top loading machines, adjusting tension on the bobbin is not exactly possible as there are no adjustment points. Instead, play around with your upper thread tension until you are satisfied.
If after all this and you still find your stitch quality to be substandard, then it is time to make an appointment to take your machine in for a service.
I hope this post helps anyone battling to get their tension adjusted correctly.


4 commentaires
Curly
Heel veel dank !!!
Patricia Redmon
Thank you so much for this information.
Jan
This is the most useful information and easy to understand. Thank you!
Anonymous
Good, muito bom 🎉❤️